I just love to make these little baskets...they are so quick & easy...good for any occasion. If anyone decides to try one, I would love it if you could leave me your blogg address so I can see your beautiful & creative creations.
I have some others off to the side....Baskets under labels if you would like to see some other variations.
This one I made for Valentines day. The paper is from K&Company. I like to use 2 sided so it looks pretty on the inside also.
OK here we go! my first tutorial...
1.I first start off with a 12x12 piece of card stock....and cut it to an 11x11 size square saving the pieces you cut off for the handle.

2.Then I score the paper every 2.75 inches both vertically & horizontally with my score-it.


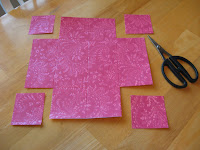
3.The next step is to cut out each of the 4 corners...cutting on the score lines.

4.Then you are going to cut the middle of each side up to the FIRST score line.


5.The next thing I do is just fold on all the score lines so it is easier to put together.
6.Then....to make it easier for me to know where to put the adhesive I fold into the center, every other square.

7.Now it is time to start putting it together...I put adhesive on all of the squares left lying on the table...I use double stick tape...but you can use whatever you prefer.

8.Then you are going to pull a right (with the tape)& a left side together.... overlapping & taping them together...I hope that makes sense. Do this 4 times until you have your basket.


9. Then go back to the strip you cut off of the 12x12 paper & stick that on for the handle.

10.Now is the fun & creative part...you can decorate your little basket any way you like...this one I used the square scraps I cut off of the corners to make the layered heart...then I put a pretty stone in the middle for some bling...& I ALWAYS have to add a bow or 2.

11. To fill your basket with treats...I always put some of this fun stuff inside. & make matching candies to put on the inside.

12. I am sure you all know how to cover candy but this is how I do it.
I take the left over squares cut them in half & slip it through my sticker maker & then stick on the candy.
 ..I think it just makes it a little more special!


And that is it!!! UFF-DA that was NOT easy for me!!! But the baskets really are very quick & easy specially if you have a score-it or a score-pall.
Good luck! I look forward to seeing some of your creations!
~~~Gwen....enjoying my crafty day off :-)

8 comments:
Woo-Hoo!!! Your first tutorial & it's absolutely awesome!!! Very clear & easy to follow, plus fabulous photos to help those who are visual learners -- great job, Gwen!!!
thanks Gwen. I am definately going to try this, your directions w/ pics make it look fairly do-able. Way to go on your first tutorial!!! Maybe I will have time to play tomorrow.
kathy sbs8
Wow that is SO neat!! I love that little basket. How cute that would be as party favors for easter or a kid's party! Thanks for photographing the whole thing!!
Fabulous basket, great tutorial love the finishing touch matching sweetie covers.
Gwen,
Are you from the midwest? We say Uff-Da. I say it all the time. I haven't heard anyone else say that since we moved to CA from MN. It totally made me laugh.
Thanks for the tutorial. It looks great, and I ca't wait to try it. :)
GWEN!!
How cute, you did it!! yeah, it's easy to follow so I can't wait to try it. You have to do more of these tutorials to help illiterate card making people like me!!!
Greta tutorial! :0) Mel
Post a Comment