Welcome to my blog!

Thank you for visiting My Crafty Days Off! I do work a full time job outside the home...so I don't get to create & post every day....If you enjoy what you see...please stop back! Leave me a comment or just say hi! So I know you were here! or you can E-mail me at snaterg@aol.com

Thursday, January 31, 2008

Another award!!

I have been given the "You Cheer Me Up Award" by one of my new SBS8 sisters Han @ http://hanscraftycreations.blogspot.com/ Thank you Han!! I also have a pay it forward to do AND I have been tagged again! I will be getting to those ASAP I promise! I would like to pass this award along to My BBGF (my best blogg girl friend) Marge http://maricopastamper.blogspot.com/ as she really does cheer me up on a daily basis!!! actually my DH has had to check on me in my craft room from time to time to see what is so funny that I can not stop laughing!!! Thanks Marge!!!
And to another blogger that I visit every day...she does not even know me... but not only is she very talented, she is so funny!! I have LOL so many times as I sat reading her blogg!! her name is Cambia http://cambriaturnbow.blogspot.com/ Thank You Cambria...you are just so funny I really enjoy reading your blog!
Thank you both!!! and if you get a chance...please pass it on!!
Gwen

Tuesday, January 29, 2008

It's different...


This is not one of my most favorite cards I have done...My friend Marge encouraged me to post any way. The original idea came again from a sketch from http://mypaperworld.blogspot.com/ again looks easy enough...but not sure if it is o.k. because of the corners.

The butterfly came from the stamp set "time well sent" from Stampin' up. The thank you...not sure?? Anyway. I used some new glitters & glue pen that I picked up at out local craft show this past weekend. Glittered the brads to match. for punches I used the Marve Gigga for the scallop oval & Stampin' ups corner punch.

I do have some other things to post but SOME people can not promise to stay away from my blgg for the next couple of days.....so will have to wait until Saturday for that one...Ha Ha Ha Ileane!!!

Now I am off to the FBR open golf tournament with my DH.

Hope you all have a fabulous day...will be back later today to check out all your stuff!!

As always...thank you for stopping by!!!
~Gwen~

P.S. It is going to be in the 60's today woot woot!!

Sunday, January 27, 2008

Spread the Love Award


"Spread the Love" award
My new SBS8 sister KELLY... http://kelleast.blogspot.com/has done me the honor of giving me a Spread the Love award - Thank You Kelly!!! This award is meant to spread blog love to others through support, comments and really all-around blog love. Since I love so many of the blogs I read all of the time, I thought this was great. I may not always comment on every blog I read, but I try to do the best I can because if you're anything like me, you love to hear from other like-minded people.
So, with that in mind, I give this award to the following great gals:
MARGE... http://maricopastamper.blogspot.com/ who not only has the most beautiful creations, but always is so supportive & helpful in all I do! Actually she has taught me most of what I know!!! Thank you dear Marge! To ETHA... http://www.moregreenwool.com/ Who is always so kind to comment in all my creations & quick to answerer all my silly questions! Thanks Etha!! You are only supposed to do 3 But...I want to add 2 more gals that I stumbled on to that are from Minnesota...Just makes me feel like home when they visit & comment on my blogg. Thank you so much ladies!!! Just love your bloggs!..ROCHELLE http://impressionsbyrochelle.blogspot.com/& KATHLEEN http://kathleenh-myhappyplace.blogspot.com/


Pass it on, ladies. Happy crafting!

Saturday, January 26, 2008

It's a guy card!


I am really enjoying the criss-cross card. I have a hard time with guy cards...just against my nature not to put on some ribbon or something that sparkles. So this was a bit of a challenge for me. I am sort of happy with the end result.
The DP is some I purchased by the sheet at the scrapbook store, The night of navy & the close to coco are from stampin' up as well as the tab on the top that is made with a stampin up punch. I made the letters with my Big Kick & a xyron sticker maker.
This card is for a challenge where you have to make a card with the word LOVE on it. The Challenge is from
http://challenge-cmutd.blogspot.com/
This is what I came up with. Hope you like it!

~Gwen~

Tuesday, January 22, 2008

Happy Birthday Nina!

This has been one of the most fun projects!! First of all this is my first try at a criss-cross card...I gotta say... I love it.. thanks to my SBS8 Lonnie @ http://www.totallyaddinktive.com/ for giving me the Tutorial & for the color inspiration I'd like to thank Debbie @http://debby4000.blogspot.com/ from the Jan 20th post...I love those blues & greens! Nina is a true girly girl! that is why all the bling!! Hope she likes it!

The paper is from the clearance table at michaels... (hey & it is not pink) I think it is so pretty, & it matches very nicely with Spampin' Ups Wild Wasabi & Blue Bayou. I also used Stampin' up's scallop punch on the card, box & the flower pops. The center circles are stamped with my brand new stamps from Papertrey with the Mixed Messages words set in the centers. The long stamp on the card insert is from CTMH.

This was a fun one!! Don't you just love the fun easy ones?? I do!

Thank's for visiting!!
~Gwen~

Sunday, January 20, 2008

My blossom won't bloom :-(


I hope most of you have seen the tutorial & beautiful creations of Pam Bassett...
well, She did a wonderful tutorial for a ribbon blossom....I gave it a try...but mine won't bloom :-( it is more like a pinwheel
sigh............. Oh well, maybe I should call it a day. The rest of the card I did using scraps of all the pink paper I have laying around.
The stamp I got at Michael's on the dollar table. All of the brads are from Michael's also. I used my new scallop punch from Stampin' up for the center.
As you can tell...I have some problems getting the paper to line up straight!..Any tips on that would be greatly appreciated!!
Thank you!....now I am depressed & need to take a break from all this :-)
See Ya soon!
Gwen

Happy Birthday to Sarinah!


OK Marge...I know I said my next card would not be pink! But this is for a girl at work that has 3 boys...I thought she could use a little pink in her life :-) & besides it is not that much pink~
For the card this is my first time trying to use a sketch...OH my heck & Uff-Daa!...this was very hard for me!! If you look at this simple sketch design...how hard could it be? Right?
http://mypaperworld.blogspot.com/ It was kind of like when my DH & I took dancing lessons...we are good dancers until someone says left foot here & right foot there...then FORGET IT! we dropped out :-(
But any way... The cute paper is from MM, the stamps are from stampin up. The little treat bag is from a template I had laying around...I doesn't have any treats in it yet as someone ate them??? Now you all know I am on a diet so it could not have been me ;-)
I have a bunch more projects to do so I better get at it!!
Happy craft day!
~Gwen~

Saturday, January 19, 2008

Simple Valentine


This is a very quick & simple Valentine card. All of the materials are from Michale's, our local craft store. With the exception of the slit punch which is from Stampin' up.

I am cleaning & organizing my craft room this AM so I will be back later today or tomorrow AM with some more creations and to check out all of yours!!!

Happy crafting!!
~Gwen~

Friday, January 18, 2008

Grandmothers Hands

This is not something I would normally post on my Blogg but I thought it was just so beautiful!!


GRANDMA'S HANDS

Grandma, some ninety plus years, sat feebly on the patio bench.
She didn't move, just sat with her head down staring at her hands.

When I sat down beside her she didn't acknowledge my presence and the
longer I sat I wondered if she was OK.

Finally, not really wanting to disturb her but wanting to check on her
at the same time, I asked her if she was OK. She raised her head and
looked at me and smiled. "Yes, I'm fine, thank you for asking," she
said in a clear voice strong.

"I didn't mean to disturb you, grandma, but you were just sitting here
staring at your hands and I wanted to make sure you were OK," I
explained to her.

"Have you ever looked at your hands," she asked. "I mean really
looked at your hands?"

I slowly opened my hands and stared down at them. I turned them
over, palms up and then palms down. No, I guess I had never really looked at
my hands as I tried to figure out the point she was making.

Grandma smiled and related this story:

"Stop and think for a moment about the hands you have, how they have
served you well throughout your years. These hands, though wrinkled
shriveled and weak have been the tools I have used all my life to
reach out and grab and embrace life.

"They braced and caught my fall when as a toddler I crashed upon the
floor.

They put food in my mouth and clothes on my back. As a child, my
mother taught me to fold them in prayer. They tied my shoes and pulled
on my boots. They held my husband and wiped my tears when he went off
to war.

"They have been dirty, scraped and raw, swollen and bent. They were
uneasy and clumsy when I tried to hold my newborn son. Decorated
with my wedding band they showed the world that I was married and loved someone
special.

They wrote my letters to him and trembled and shook when I
buried my parents and spouse.

"They have held my children and grandchildren, consoled neighbors, and shook in fists of anger when I didn't understand.

They have covered my face, combed my hair, and washed and cleansed the
rest of my body. They have been sticky and wet, bent and broken,dried
and raw. And to this day when not much of anything else of me works
real well these hands hold me up, lay me down, and again continue to
fold in prayer.

"These hands are the mark of where I've been and the ruggedness of life.

But more importantly it will be these hands that God will reach out
and take when he leads me home. And with my hands He will lift me to
His side and there I will use these hands to touch the face of
Christ."

I will never look at my hands the same again. But I remember God
reached out and took my grandma's hands and led her home.

When my hands are hurt or sore or when I stroke the face of my
children and husband I think of grandma. I know she has been stroked and
caressed and held by the hands of God.


-- Author Unknown

I hope some of you enjoyed that (it made me cry happy tears)
Have a beautiful Friday....be back tomorrow!
~Gwen~

Wednesday, January 16, 2008

Mod Podge Tutorial

I have had some requests as to how I do my letters & my door hangers with Mod Podge....so here goes another tutorial.

The letters & door hangers I get at our local craft store, (very inexpensive) Then you will need the Mod podge....to the left is the brand I like best. a paint brush or sponge & some sand paper. & then any another things you like to decorate!


I learn best by pictures so that is how I will do my tutorial...first you cut you paper of choice a little larger than the object you are covering....then you cover the FRONT of it with a thin layer of Mod Podge.


Then place your paper RIGHT SIDE UP....(I have put the paper on the wrong way many times grrrrrrr!)
& smooth it with your fingers or I like to use my brayer....then just set it aside to dry for a bit.


Once it is dry...it doesn't take long...flip it over & with an exacto knife trim all the edges...it does not have to be perfect as you will be sanding the edges. FYI...this is 2 sided paper in case you were wondering.


The next step is to sand all of the edges with a very fine sand paper.....once this is done you can ink the edges with some ink & a sponge if you like....with this one I only did it a little bit with white as I wanted it to be light & cheery.


That it it...now you have your pallett to do with as you wish!


That is it!!! give it a try! it really is very simple!
Have a fab day!!
~Gwen~

Monday, January 14, 2008

Happy Birthday Samm...Challenge

When I found this flower on clearance a while back...I thought it would be way to big for a card.....now...I think not! I like it. I actually took the flower apart a bit & added 2 white stampin' up flowers & the brad from the "pretties kit".
I used black paper for the card itself & them matted it with a page from my "all dressed up" mat stack. I am not sure where the Happy Birthday stamp is from but the pink paper is from Stampin' up...pretty in pink...added a couple of little bits of bling to the Happy Birthday...and that is it.

This is my first attempt at a challenge/blogg candy...hope I am doing it right.
Happy Birthday Samm!!!

Gwen
SBS-8

Sunday, January 13, 2008

LOVE


Finally!!!! back to the blogg...It has been a busy week...The diet was going great until the weekend! My husband wanted to go out to dinner Friday after work & who can resist chips & salsa sitting right in front of you?? I did make it to the gym a few times, so guess I am doing O.K. with that.

I made this as a Valentine decoration just for ME! The letters are something new at Michales, our local craft store...they are wood & only a couple of bucks each.

First I painted them black, then I Mod Podge scrapbook paper to the front. The paper I chose in single sheets at a local scrapbook store. Once the paper is on the front I sanded all of the edges & inked with black stampin' up ink & a sponge. Then added the embellishments....and that's it!! very quick & easy.

Now I am going to blogg surf for a while....have only had a chance here & there to take sneek peeks at what you all have been up to!...I'm so excited!!!

Happy Crafting!

Gwen

Monday, January 7, 2008

mail center


In my quest to be a bit more organized in 2008....I made this little mail/note holder for my daughter Angie... she is 20 & no longer lives at home but still gets mail here from time to time.
soooo... this is what I came up with to keep all of her mail & messages in one spot. Instead of here there & everywhere.....plus she can find it even when I am not at home :-)
This is actually an envelope with the top cut off & the front decorated with scraps of stuff I had around. The cute little holder...I learned to do from my friend & fellow blogger Marge. http://maricopastamper.blogspot.com/
For all you stampin' uppers....you will recognize the little pocket stamp from a while back.... I believe the set was pocket fun?? It is open at the top so I can actually put notes in it. Things I need to remember & tell her....but most often forget :-(

This shows the envelope with mail in it & a note in the little pocket....It actually can hold several pieces of mail..... Now I think I should make one for my son...he still lives at home...but many days our paths never cross. :-(
I actually made one of these for work awhile back with directions to our office Christmas party in it for everyone to take....That is when I got the original idea....(it is in the labels section under note holders).....in case you want to see another version.

Thanks for visiting!!!
It is another great!!~crafty day off~
Gwen

Sunday, January 6, 2008

Thank you purse


This is a little thank you purse for my niece....the paper is from some scraps I had....the yellow paper I wanted to be sparkly so I "painted" it with some yellow stickles. I made the tag with Stampin' up's tag punch set. I also yellow stickled the flower. I believe the green brads are from our local craft store, Michales. I used stampin' up's punch to make the scallops.

Saturday, January 5, 2008

Basket Tutorial


I just love to make these little baskets...they are so quick & easy...good for any occasion. If anyone decides to try one, I would love it if you could leave me your blogg address so I can see your beautiful & creative creations.
I have some others off to the side....Baskets under labels if you would like to see some other variations.
This one I made for Valentines day. The paper is from K&Company. I like to use 2 sided so it looks pretty on the inside also.
OK here we go! my first tutorial...

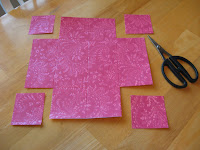
1.I first start off with a 12x12 piece of card stock....and cut it to an 11x11 size square saving the pieces you cut off for the handle.


2.Then I score the paper every 2.75 inches both vertically & horizontally with my score-it.

3.The next step is to cut out each of the 4 corners...cutting on the score lines.


4.Then you are going to cut the middle of each side up to the FIRST score line.


5.The next thing I do is just fold on all the score lines so it is easier to put together.


6.Then....to make it easier for me to know where to put the adhesive I fold into the center, every other square.


7.Now it is time to start putting it together...I put adhesive on all of the squares left lying on the table...I use double stick tape...but you can use whatever you prefer.


8.Then you are going to pull a right (with the tape)& a left side together.... overlapping & taping them together...I hope that makes sense. Do this 4 times until you have your basket.


9. Then go back to the strip you cut off of the 12x12 paper & stick that on for the handle.


10.Now is the fun & creative part...you can decorate your little basket any way you like...this one I used the square scraps I cut off of the corners to make the layered heart...then I put a pretty stone in the middle for some bling...& I ALWAYS have to add a bow or 2.


11. To fill your basket with treats...I always put some of this fun stuff inside. & make matching candies to put on the inside.


12. I am sure you all know how to cover candy but this is how I do it.


I take the left over squares cut them in half & slip it through my sticker maker & then stick on the candy...I think it just makes it a little more special!


And that is it!!! UFF-DA that was NOT easy for me!!! But the baskets really are very quick & easy specially if you have a score-it or a score-pall.
Good luck! I look forward to seeing some of your creations!


~~~Gwen....enjoying my crafty day off :-)

The most simple card!


This is the most simple & quick card! Now I realise I could have done allot more with this.....but sometimes time does not allow!
This is done with stampin' up paper...you can not see it in the picture but the black is embossed with flowers with my big shot embosser. I used my Marvy giga punch for the scallop oval & my Fiscars for the center oval. I have had that flower punch for a long time...not sure where it is from. The Many thanks stamp is from Stampin' up, as well as the pearls.

Thursday, January 3, 2008

bling it up baby!


Yes...I am still on the thank you cards! I make thank you cards for my children to send to all who sent them gifts and a few for myself...SO it gets to be allot! such a shame I don't enjoy it...tee heee hee!!
I found the cutest paper pack at Michale's on clearance the other day. It's a glitter stack with 72 pages for 4 bucks!! This is what I used for the background...the pink & black are from Stampin' Up. & so is the stamp....(such a shame I have had this set & never used it!!) The tiny white heart...if you can see it...is a brad I got at Michale's. I also use Stampin' up's round corner punch & ticket punch. sorry the picture is not good...It is hard to get a good one when you leave for work in the dark & get home in the dark :-(

Tuesday, January 1, 2008

Happy New Year!!!

Happy New Year everyone!! I know this is not a New Year card...I am still stuck on the thank you's! This cards colors came about just because of those little teal dots...I got them at our local craft store on clearance...thought they were so pretty, just had to have them...then just had to use some of them. Matches perfectly with Stampin' ups Taken with teal paper. used gigga punch for the scallop circle & cut the slightly larger teal one with my old fashioned Fiscars circle cutter. I do not know where I got that circle stamp. All of the ribbon is from our local craft store.
Hope you all had a fun New Years celebration...I actually made it 'till midnight this year! We just had dinner at home...just me & my husband. He made a fire in the fire pit as it was a bit chilly. Then we came in for some karaoke :-) A couple of our neighbors came over for a bit to watch the ball drop... that was it ...exciting huh?? just the way we like it!

LinkWithin

Blog Widget by LinkWithin

Country Thunder 2009

Country Thunder 2009
My hubby needs a shave!

Photo class home work